
Unity Cloud Build 自动化打包 IPA 并上传 App Store Connect 踩坑实录
最近给 Unity 项目搭建 iOS 自动化发布流程,原本规划是使用 GitHub Actions 完成整个流程:
GitHub Actions
    ↓
Unity Build
    ↓
生成 IPA
    ↓
上传 App Store Connect
看起来很美好,但实际落地过程中踩了不少坑。最终放弃 GitHub Actions 打包,转而采用 Unity Cloud Build(UCB)方案。
这篇文章记录几个最关键的问题,以及最终的解决方案。
Unity License
最开始打算直接使用 GitHub Actions 构建 Unity 项目。
结果第一步就被 Unity License 卡住了。
Personal License
网上很多教程都会提到:
CI 环境激活 Unity License但大多数教程默认使用的是:
Unity Pro
Unity Plus
而我使用的是:
Unity Personal问题就在这里:Personal License 不再支持离线激活12。Unity Personal License 的激活方式只剩下:Unity Hub 登录,无法像Pro License 那样通过 License 文件进行稳定的离线激活。
也就是说:
本地电脑
↓
Unity Hub 登录
↓
激活成功
这样是没有问题的,但是:
GitHub Actions
↓
无界面环境
↓
无法正常使用 Unity Hub
那么问题就来了。
社区方案失效
也查到的一些方案,例如:
unity-builder
game-ci
大多都涉及 .alf → .ulf 的 License 激活流程。Unity 关闭Personal License后,这类方案貌似也失效了,就没有继续测试了。
Editor 体积和缓存问题
除了刚刚的License问题,Github Action 打包还有一个更严重的问题。Unity Editor可执行高达5G(以我们现在用的6000.3.15f1为例)要是每次去下载,浪费太多时间。即使缓存下来,每次恢复也是不小的耗时。
Unity 项目最大的时间消耗其实是:
Library理论上可以缓存。但实际上:
升级 Unity
升级 Package
修改依赖
之后缓存很容易失效。最终构建时间可能不会太理想。
UCB
这种情况,索性直接切换到:Unity Cloud Build(UCB)
因为:
- Unity 官方托管
- 不需要处理 License
- 不需要安装 Editor
- 不需要维护构建环境
- 直接支持 ipa 导出
构建稳定性明显提升。基本不需要做什么操作。添加代码仓库后,添加构建目标,很少的操作就能完成构建。具体操作就不讨论了。
UCB 打包后上传 App Store Connect:Fastlane 的 AppStoreInfo.plist 坑
解决打包问题后,下一步就是上传 IPA。最开始选择:
Fastlane毕竟是目前流行的方案。
AppStoreInfo.plist
刚开始尝试FlastLane上传,毛病就来了(FlastLane具体操作方法不在本文讨论范文,改天重开一篇写一下),我是用wsl操作的。
user@ubuntu:~/Vermilion$ fastlane pilot upload \
--ipa "/home/user/app/33263704908528-app-default-ios-2.ipa" \
--api_key_path "/home/user/app/api_key.json"
[✔] 🚀
[16:38:21]: Get started using a Gemfile for fastlane https://docs.fastlane.tools/getting-started/ios/setup/#use-a-gemfile
[16:38:22]: Creating authorization token for App Store Connect API
[16:38:23]: Ready to upload new build to TestFlight (App: xxxx)...
[16:38:23]: Going to upload updated app to App Store Connect
[16:38:23]: This might take a few minutes. Please don't interrupt the script.
[16:38:23]: AppStoreInfo.plist is required for uploading .ipa files on non-macOS platforms.
[16:38:23]: Expected AppStoreInfo.plist in the same directory as the .ipa file.
[16:38:23]: Generate it by running either 'fastlane gym [...] --generate_appstore_info'
[16:38:23]: Or add '<key>generateAppStoreInformation</key><true/>' in an options.plist then run 'fastlane gym [...] --export_options options.plist'.

[!] Missing required AppStoreInfo.plist file for iTMSTransporter upload
看到这里,人直接懵了,之前github action操作也是用 fastlane 上传啊,怎么这里不对了?需要AppStoreInfo.plist,这是个啥文件?UCB 导出的产物里面根本没有这个文件啊。
继续搜索资料后发现。很多人给出的解决方案是:
找一台 Mac
Archive 一次
导出 AppStoreInfo.plist
于是专门借了一台 Mac。按操作Archive后,确实拿到了AppStoreInfo.plist。把这个文件放到 IPA 同目录后,Fastlane 确实能继续往下执行。但是,实际测试发现根本不是这么回事。因为这个文件里面包含大量构建相关信息:
CFBundleVersion
CFBundleShortVersionString
Team 信息
签名信息
Provisioning Profile
导出配置
图标配置
...
AppStoreInfo.plist并不是一个简单的配置文件。文件内容很复杂,别的mac导出的,大概率是不能直接为ucb新生成的ipa使用的。最终还是放弃了,不折腾他了。
第三方上传工具
后来也试过,开心上架(App Uploader),但是,它依赖 Apple ID + App 专用密码(App-Specific Password)。而我更希望整个流程基于:
API Key
Issuer ID
p8 私钥
实现完全自动化。因此最终也没有采用这类方案。
Post-build script
多方查阅,发现ucb提供了 Post-build script3,可以在 ucb 构建完成后执行一个脚本。这不就简单了么。
在 ucb 的配置里,添加构建目标,添加三个环境变量:
APPLE_API_KEY_ID: API_KEY_ID
APPLE_API_ISSUER_ID: ISSUER_ID
APPLE_API_KEY_CONTENT_BASE64: p8文件base64值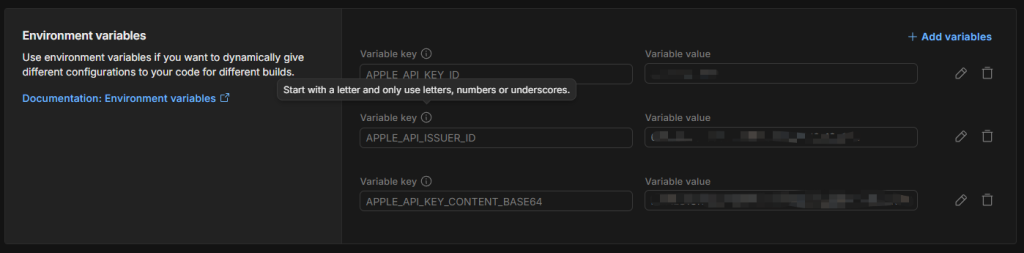
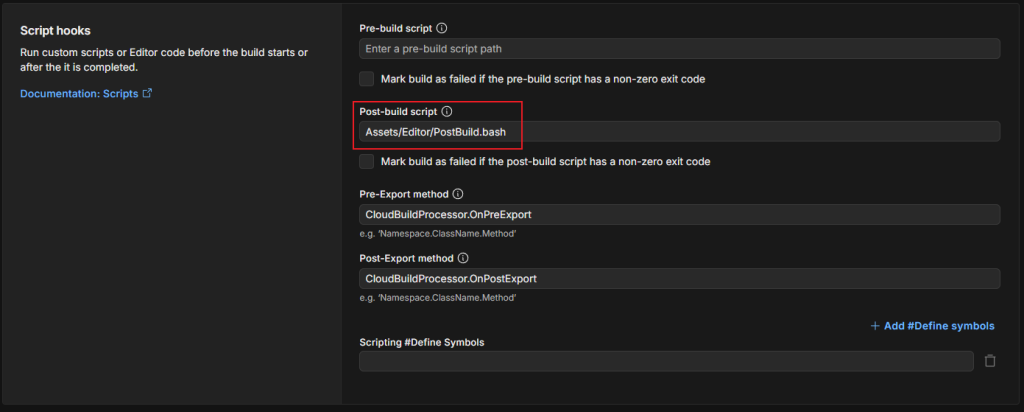
添加以下脚本到 Assets\Editor\PostBuild.bash
#!/bin/bash

echo "========================================================="
echo "  Starting App Store Connect Auto-Upload Flow (V3)      "
echo "========================================================="

# 1. 动态探测并定位 IPA 文件的绝对路径 (主动去 workspace 深度搜索)
echo "Searching for generated IPA file..."
PATH_TO_IPA=$(find "$WORKSPACE/.build/last" -name "*.ipa" 2>/dev/null | head -n 1)

if [ -z "$PATH_TO_IPA" ] || [ ! -f "$PATH_TO_IPA" ]; then
    echo "[ERROR] 在 $WORKSPACE/.build/last 目录下没有找到任何 .ipa 文件!"
    echo "请确认 Unity 编译阶段是否成功结束。"
    exit 1
fi

# 2. 还原 p8 文件
PRIVATE_KEYS_DIR="$HOME/.private_keys"
mkdir -p "$PRIVATE_KEYS_DIR"
PRIVATE_KEY_FILE="$PRIVATE_KEYS_DIR/AuthKey_${APPLE_API_KEY_ID}.p8"

echo "Cleaning and Decoding Apple Auth Key file from Base64..."
echo "$APPLE_API_KEY_CONTENT_BASE64" | base64 -D > "$PRIVATE_KEY_FILE"

# 3. 校验文件大小
if [ ! -s "$PRIVATE_KEY_FILE" ]; then
    echo "[ERROR] Base64 解码失败,解出来的密钥文件内容为空!"
    exit 1
fi

# 4. 调用苹果官方 altool 交付工具
if xcrun altool --upload-app \
    -t ios \
    -f "$PATH_TO_IPA" \
    --apiKey "$APPLE_API_KEY_ID" \
    --apiIssuer "$APPLE_API_ISSUER_ID" ; then

    echo "========================================================="
    echo " 🎉 TestFlight 上传成功!"
    echo "========================================================="
    rm -f "$PRIVATE_KEY_FILE"
    exit 0
else
    echo "========================================================="
    echo " ❌ App Store Connect 交付失败,请检查上方苹果返回的错误码。"
    echo "========================================================="
    rm -f "$PRIVATE_KEY_FILE"
    exit 1
fi
构建配置里,Post-build script,设置成 Assets/Editor/PostBuild.bash。
Bingo! 搞定。
CFBundleVersion 自动递增问题
上传成功后又遇到苹果经典错误:
CFBundleVersion must be higher than previous version应用市场要求(不止是苹果)CFBundleVersion必须递增(ios是CFBundleVersion,Android是versionCode),对于普通ios项目、flutter,可以通过脚本修改Info.plist信息,实现CFBundleVersion的增加。Unity项目里除了在项目设置里,还真没发现在哪里修改。如果每次手动改,每次更新前总是会忘记,尤其多人协作项目,不能依赖人操作。
使用时间戳作为 Build Number
解决方法就是,在 UCB 的 Pre-Export method 阶段自动执行:
using System;
using System.IO;
using UnityEditor;
using UnityEngine;

#if UNITY_IOS
using UnityEditor.iOS.Xcode;
#endif

/// <summary>
/// Unity Cloud Build (UCB) 自动化构建回调处理类
/// </summary>
public static class CloudBuildProcessor
{
    /// <summary>
    /// 【UCB 配置】请填入 UCB 后台的 Pre-Export Method 输入框:CloudBuildProcessor.OnPreExport
    /// 执行时机:Unity 开始导出工程之前
    /// </summary>
    public static void OnPreExport()
    {
        SetIOSBuildNumber();
    }

    /// <summary>
    /// 内部功能:将 iOS 的 Build 号 (CFBundleVersion) 自动配置为当前时间戳
    /// </summary>
    private static void SetIOSBuildNumber()
    {
        string buildNumber = DateTimeOffset.UtcNow.ToUnixTimeSeconds().ToString();
        PlayerSettings.iOS.buildNumber = buildNumber;
        Debug.Log($"[UCB Pre-Export] iOS CFBundleVersion / Build Number 已设置为: {buildNumber}");
    }


}
效果:
1752847001
1752933401
1753019801
天然递增,永不重复。苹果对这个字段没有最大值限制,可以一直用下去。在UCB后台,构建里,将的 Pre-Export Method 输入框:CloudBuildProcessor.OnPreExport
苹果出口合规(Export Compliance)问题
解决 Build Number 后,上传成功。TestFlight 正常应该是会自动处理,发送邮件给测试人员。等了半天,没收到邮件,上去瞅一瞅,呦,出口合规问题又出来了。原先的操作也是在Info.plist里添加ITSAppUsesNonExemptEncryption。又回到了刚刚的问题,没有Info.plist啊。
UCB 自动注入
解决方法还是要靠UCB啊。Post-Export是在构建完成后执行。
using System;
using System.IO;
using UnityEditor;
using UnityEngine;

#if UNITY_IOS
using UnityEditor.iOS.Xcode;
#endif

/// <summary>
/// Unity Cloud Build (UCB) 自动化构建回调处理类
/// </summary>
public static class CloudBuildProcessor
{

    /// <summary>
    /// 【UCB 配置】请填入 UCB 后台的 Post-Export Method 输入框: CloudBuildProcessor.OnPostExport
    /// 执行时机:Unity 成功生成 Xcode 工程之后,开始编译 IPA 之前
    /// </summary>
    /// <param name="pathToBuiltProject">UCB 自动传入的 Xcode 工程根目录路径</param>
    public static void OnPostExport(string pathToBuiltProject)
    {
        FixIOSExportCompliance(pathToBuiltProject);
    }

    /// <summary>
    /// 内部功能:在生成的 Info.plist 中自动注入苹果出口合规证明 (ITSAppUsesNonExemptEncryption = false)
    /// </summary>
    private static void FixIOSExportCompliance(string pathToBuiltProject)
    {
        Debug.Log($"[UCB Post-Export] 正在开始修改 Info.plist,目标路径: {pathToBuiltProject}");

#if UNITY_IOS
        // 1. 获取并读取 Info.plist
        string plistPath = Path.Combine(pathToBuiltProject, "Info.plist");
        if (!File.Exists(plistPath))
        {
            Debug.LogError($"[UCB Post-Export] 未找到 Info.plist 文件: {plistPath}");
            return;
        }

        PlistDocument plist = new PlistDocument();
        plist.ReadFromFile(plistPath);

        // 2. 插入关闭出口合规提示的布尔值
        PlistElementDict rootDict = plist.root;
        rootDict.SetBoolean("ITSAppUsesNonExemptEncryption", false);

        // 3. 保存文件
        plist.WriteToFile(plistPath);
        Debug.Log("[UCB Post-Export] 成功向 Info.plist 写入 ITSAppUsesNonExemptEncryption = false");
#else
        Debug.LogWarning("[UCB Post-Export] 当前非 iOS 平台环境,跳过 Info.plist 修改。");
#endif
    }
}
在UCB 后台的 Post-Export Method 输入框: CloudBuildProcessor.OnPostExport。
构建时自动完成。无需人工干预。
搞定,手工。
最终流程
最终形成的自动化发布链路:
Git Push
    ↓
Unity Cloud Build
    ↓
Pre-Export
    ├─ 自动生成 CFBundleVersion
    ↓
生成 Xcode 工程
    ↓
Post-Export
    ├─ 自动写入出口合规配置
    ↓
生成 IPA
    ↓
Shell Script
    ├─ 自动寻找 IPA
    ├─ 自动恢复 API Key
    ├─ altool 上传
    ↓
TestFlight
整个流程下来:
- 不依赖 GitHub Actions 构建 Unity
- 不依赖 Fastlane
- 不依赖 App Uploader
- 不需要手工修改 Build Number
- 不需要每次填写出口合规信息
对于使用 Unity Personal License 的独立开发者来说,这套方案比 GitHub Actions 更加稳定。